OutStandingScreens Set-up
If you don't want to read our instructions, watch this set-up video instead.
OutStandingScreens™ have been designed to offer a versatile and forgiving outdoor setup. Following is a simple and direct method using stakes in an open area. Once you have staked out your best location, the screen itself goes up with ease. A few adjustments here and there and the next thing you know you're standing next to an outdoor screen over 11 feet tall. The instructions are written for one person, and a single person can put up even the largest screen.
TIP: It never hurts to have help! You can do this alone, but we never turn down a helpful hand. Inexperience, or wind during setup can make things more difficult. If it is dead calm, take your time, but if there is a wind to contend with, the sooner the screen is stabilized by all ropes the better. A little help goes a long way.


(Click to download 6 panel or 6 page pdf manual)
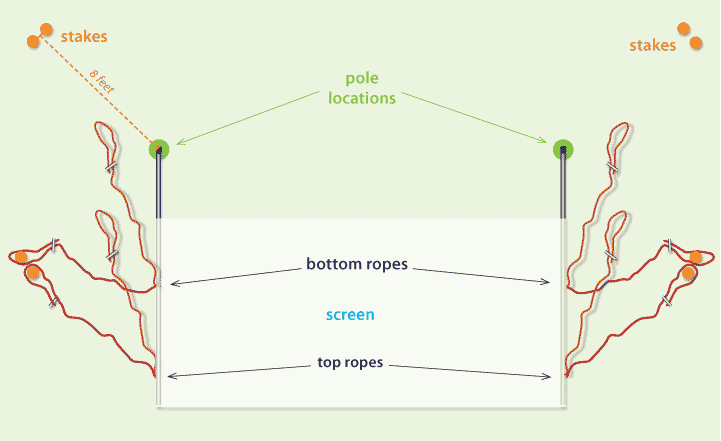
1. Lay out screen and stake positions
1. Mark the center point of your screen.
Measure and place a marker at the distance the screen needs to be from your projector (see projector specifications).
2. Mark the ends of your screen (green dots).
The screen should squarely “face” the projector. Everything is square when the
measurements (“A” and “B”) from the screen ends (green dots) to the projector are the same.
3. Place your stakes.
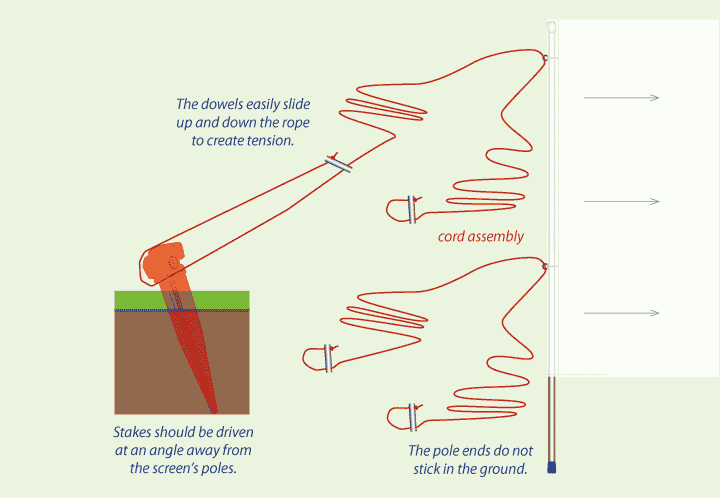
The stakes (orange dots) are placed 8 feet out from the pole base locations (green dots) at 45° angles off the ends of the screen. The stakes should be driven at an angle away from the rope tension (see illustration).

2. Stand the screen
1. Lay the screen out and connect the poles.
Spread the screen out on the ground with the rubber feet on the green dots (illustration above). Eyebolts should all face outwards. Join the pole segments. The top pole is narrowed and fits into the lower pole. There is an opening in the screen to show the connection.
2. Untie the ropes.
There are two pairs of ropes on each pole, top and bottom. Untie both sets, separate, and lay them out.
3. Loop bottom front ropes onto the front stakes.
Slide the dowel up about three feet. The dowel is what tensions the ropes.
4. Loop top front ropes onto the other front stakes.
Slide the dowel up about three feet. By this point all front ropes are looped on front stakes and none of the back ropes are connected.
5. Connect one back top rope.*
Grab one top back rope and walk it back to the back stake. As you do this, the pole will stand up on or near your pole positions (green dots).
6. Connect the other back top rope.*
Stand the other end of the screen as above. Once both top back ropes are looped and tensioned, the screen will be standing. Connect the remaining back bottom ropes.
*If you have an assistant, do steps 5 and 6 at the same time.
3. Adjust to straight.
1. Adjust tension on all ropes.
Continue to adjust all ropes incrementally until the poles stand straight up and down and the tension on all ropes is about the same.
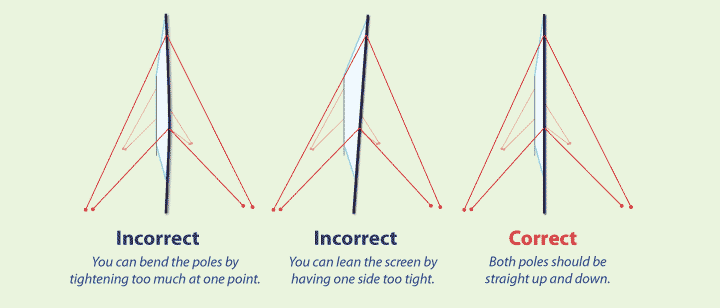
HINT: It helps to stand back and look at your progress. You will also adjust the location of the feet as they have likely moved a little from your “green spots.”
 |
|